number
per carb
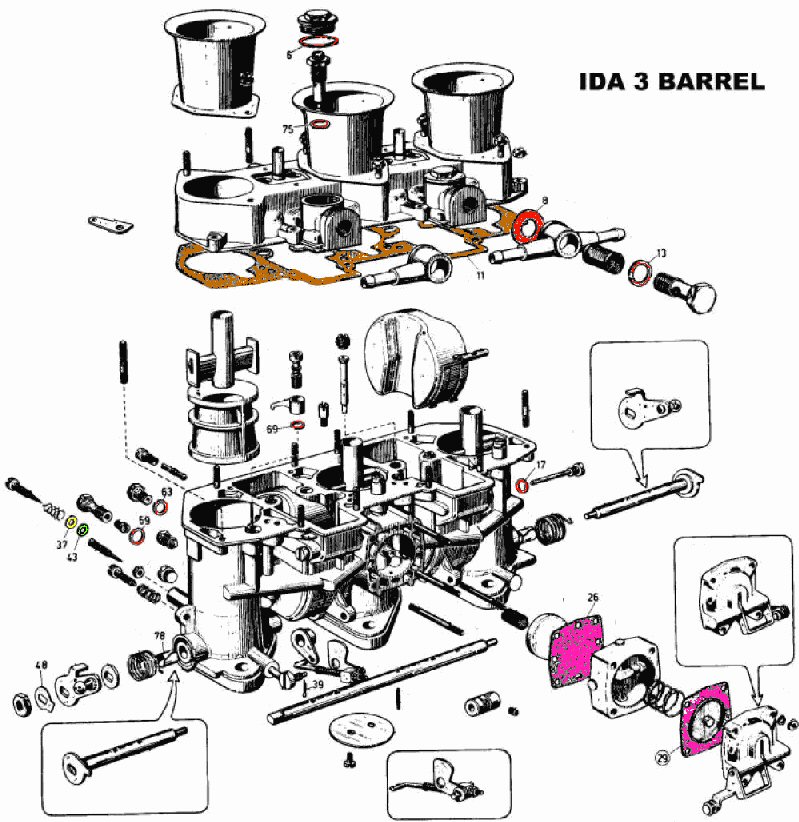
40 IDA 3C
vintage
40 IDA 3C
2006
| diagram number |
Quantity per carb |
Description 40 IDA |
Weber no. 40 IDA 3C vintage |
material |
finish |
Weber no. 40 IDA 3C 2006 |
graphics | notes from vintage pieces |
ref |
| 75 |
2 |
gasket, needle valve |
41530.005 |
fiber |
red |
41530.005 |
10 x 15 x 1 |
||
| 6 |
2 |
gasket, plug |
41530.035 |
fiber |
41530.035 |
22 x 26 x 0.85 |
|||
| 8 |
2 |
gasket, fuel inlet |
41530.004 |
fiber |
41530.004 |
12 x 23 x 1 |
|||
| 11 |
1 |
gasket, cover |
41710.001 |
paper |
41710.001 |
0.7 thickness |
|||
| 13 |
2 |
gasket, fuel inlet |
41530.001 |
fiber |
41530.001 |
12 x 18.5 x 1 |
|||
| 17 |
2 |
gasket, copper flat ring |
41530.017 |
copper |
41530.017 |
6.10 x 9.0 x 0.86 |
|||
| 26 |
1 |
diaphragm, plain, pump |
47405.011 |
flex mat |
red |
47405.011 |
|||
| 29 |
1 |
diaphragm, metal, pump |
47407.010 |
flex mat |
red |
47407.010 |
|||
| 37 |
3 |
washer, needle oring seal |
55510.018 |
brass |
nat |
55510.018 |
5.5 x 9.0 x 0.50 |
||
| 43 |
3 |
Oring |
41565.002 |
rubber |
black |
41565.002 |
AS568A# - 008 |
||
| 59 |
3 |
gasket, main jet retainer |
41540.001 |
copper |
nat |
41540.001 |
8.0 x 11.0 x 0.55 |
||
| 63 |
2 |
gasket, bowl drain plug |
41530.008 |
fiber |
41530.008 |
7.0 x 10.6 x 0.85 |
|||
| 69 |
3 |
gasket, pump jet |
41530.012 |
fiber |
red |
41540.014 |
5.75 x 9.0 x 0.80 |
||
| items not adressed by Weber spec sheet |
|||||||||
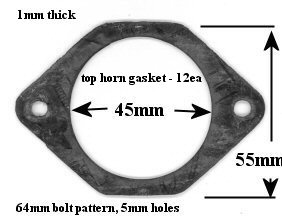
| 3 |
gasket, air horn to top | paper |
|
45 bore x 65 bolt pattern x 1mm thk x 6mm holes |
|||||
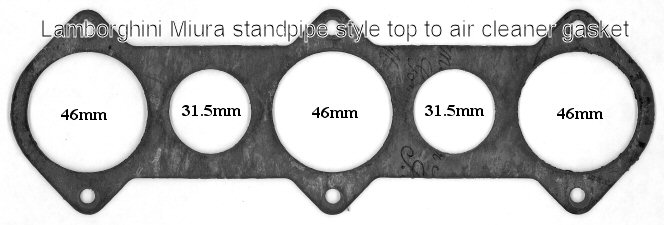
| 1 |
gasket, top to air cleaner plate |
paper |
|
stand pipe carb |
|||||
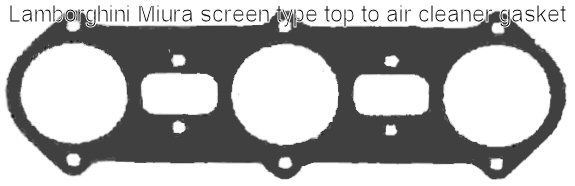
| alt |
1 |
gasket, top to air cleaner plate |
paper |
|
screen carb |
||||
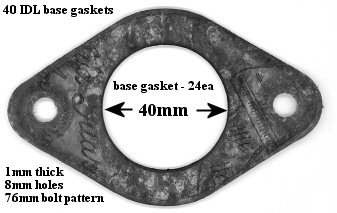
| 6 |
gasket, base |
paper |
|
40 bore x 76 bolt pattern x 1mm thick x 9mm holes |
|
||||
| other items usually included in a basic Rebuild "kit" |
|||||||||
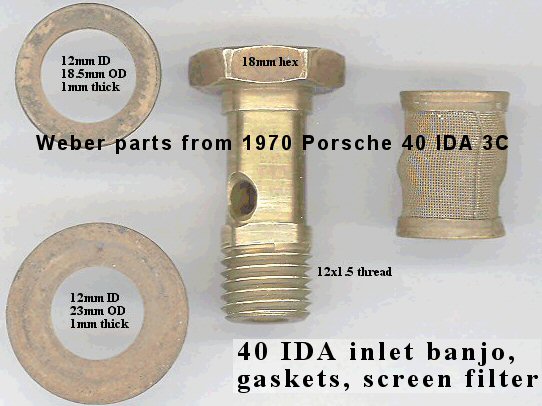
| 5 |
2 |
needle valves, pin valves |
64240.009* | brass/steel |
79508.* |
175 |
marked - EW 175 |
||
| Porsche |
cyl |
size |
Weber |
choke |
sec |
main |
idle |
air |
emul |
air |
jet |
bleed |
needle |
notes |
| 904GTS |
4 |
1956 |
46 IDA 2/3 |
40 |
4.50 |
1.70 |
0.60F10 |
- |
F14 |
1.30 |
0.50 |
0 |
3.00 |
|
| 911L |
6 |
1991 |
40 IDA 3C/1 |
30 |
4.50 | 1.25 |
0.55 |
1.10 |
F26 |
1.80 |
0.50 | 0 |
1.75 |
|
| 911USA |
6 |
1991 |
40 IDAP 3C/1 |
30 |
4.50 | 1.25 |
0.52 |
1.10 |
F26 |
1.80 |
0.50 | 0 |
1.75 |
|
| 911S |
6 |
1991 |
40 IDS 3C/1 |
32 |
4.50 | 1.30 |
0.55 |
1.10 |
F3 |
1.80 |
0.50 | 0 |
1.75 |
|
| 911T |
6 |
1991 |
40 IDT 3C/1 |
27 |
4.50 | 1.10 |
0.50 |
1.10 |
F2 |
1.85 |
0.50 | 0 |
1.75 |
|
| 911T |
6 |
1991 |
40 IDTP 3C/1 |
27 |
4.50 | 1.10 |
0.45 |
1.45 |
F1 |
1.85 |
0.50 | 0 |
1.75 |
|
| Carrera 6 |
6 |
1991 |
46 IDA 3C/1 |
42 |
4.50 | 1.70 |
0.70 |
0.80 |
F24 |
1.45 |
0.50 | .40 |
1.75 |
|
| 914/6 |
6 |
1991 |
40 IDTP 13C/1 |
27 |
4.50 | 1.05 |
0.50 |
1.45 |
F1 |
1.70 |
0.50 | 0 |
1.75 |
| diagram number |
Quantity per carb |
Description 40 IDA |
Weber no. 40 IDA 3C vintage |
material |
finish |
Weber no. 40 IDA 3C 2006 |
graphics click big | notes from vintage pieces dimensions usually metric, mm |
ref |
| 37 |
3 |
washer, needle oring seal |
55510.018 |
brass |
nat |
55510.018 |
5.5 x 9.0 x 0.50 |
replaced with cup style? |
|
| 43 |
3 |
Oring |
41565.002 |
rubber |
black |
41565.002 |
table | AS568A# - 008 = 4.47id x 1.78thick |
|
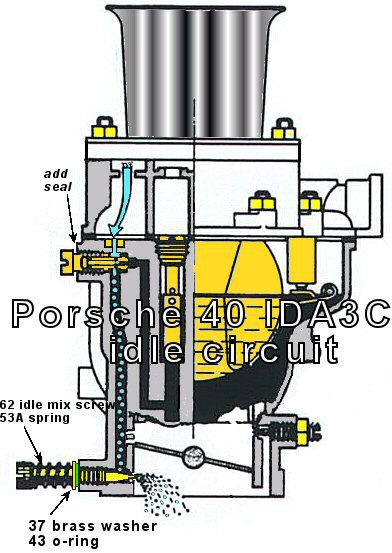
| 53A |
3 |
spring, idle mix screw |
47600.060 |
steel |
yZ |
47600.060 |
L=14mm, wire=1.0mm, coils=5.75 |
||
| 62 |
3 |
needle, screw idle mix |
64750.004 |
steel |
yZ |
64750.004 |
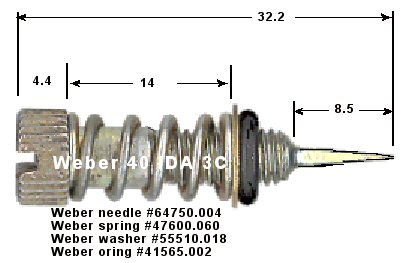 | see graphics |
|
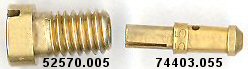
| 65 |
3 |
jet, idle |
brass |
nat |
74403. |
 |
|||
| 66 |
3 |
jet holder |
brass |
nat |
52570.005 |
|
|||