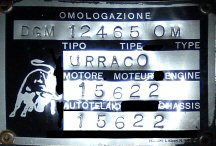
 Urraco P250/300 Reference List
a technical comparision resource for all
Lamborghini Miura enthusiasts
Lamborghini Miura P400
parts list, Lamborghini Miura P400S parts list, Lamborghini Miura
P400SV, Lamborghini
Miura P400, Lamborghini Miura P400S, Lamborghini Miura P400SV, Lamborghini
Miura P400, Lamborghini Miura P400S , Lamborghini miura parts
list, Miura parts list,
If you are looking for
gleaming paint and bodywork, you will need to visit the more than 100
wonderful sites available. This is not the site for you. This is
primarily a website for skinned knuckles and dirty fingernails.
If you have a Miura under restoration, please e-mail me, maybe I can
help. I need help in providing more detail on this site as well.
 most Urraco documentation provided by Bryan Liss and Caleb Bradley
I need more valuable documetation
for Urraco. i will add it to this site and i hope to improve and
expand this Urraco site as well
please email - p400@comcast.net
notes from VLG and other sources -
2009/12/15-
The headlight bucket is held in place by two pins that also act as the swivel or hinges to open/close the headlight
-you need to remove the headlight from the bucket and you will have better access and view.
-each pin has a bolt to lock it in place ( 8mm head if I
remember) ...you need to loosen (very carefully so as not to break it )
this bolt.
-then you will be able to slide the pin away from the car body to the inside of the bucket.
-I would suggest you make sure both pins slide easily before
removing one completly, as you may ( will) damage the paint when the
bucket is no longer held in place. I would use masking or painters tape
around the bucket surround to protect the paint.
- If the pins have been greased they will probably slide
easily...otherwise they could be quite hard to budge and you will need
rust busters, etc.
ReV
2007/02/16 -
I replaced all my valves to be swirled stainless and totally
agree that all Urraco owners should follow this practice... I
paid $23.00 US for the valves ea. and would highly reccomend
doing it. As for the high revs I have not hit that mark yet but look
forward to consistant 7500REV ... Race Engine Valves in California I
sent them an intake and an exhaust and they responded with a valve that
is "drop in ready" for the price of . and I pay all shipping. Valves
were great!!!!! - The info is: Racing Engine Valves 4704
N.E. 11th Avenue Ft Lauderdale, Fl. 33334 Salesman
was Ralph
Intake valve----S-1 BL5105 48.00 MM - 124.50 MM - 8 MM ----$23.00 ea.
Exhaust Valve ---REV CL1161---1.500 +70 LS1 ----$23.00 ea.
My invoice # was 82110 if they can look up that invoice for
clarification. The BL5105 may be wrong as the invoice is smuged so it
is a best guess..looks right to me but the main thing is the valve
dimensions are correct. Glad to help as I know these are good valves
and fit was perfect according to my cylinder head guy.
Cheers Glenn Weir
(Apr 2007 Urraco#15580 restoration by Brian P) '74 Urraco P250S #15580 - hiall,
my urraco has been in perth, australia for quite abit now,and im just
starting restorations.(i came back from singapore on a shortbreak) i
have decided to start on the interior first, so basically,ripping every bit of carpeting and seats etc out. ive removed the
firewall from behind the rear seats too, which were glued on and had
slight rust running up behind it( surface only, thk god). can anyone
help me with the roof removal? theres an air duct above the rear seats
which i assume lead out to those slits on the ceiling, but how can i
disassemble this part so i can rust treat it?? firstly, of course is
getting the ceiling off which i dunno how to. also, any tips on
where all the screws are for taking out thedashboard too..
-------------------------------------
First take off the radio panel. That is held by the edge of the instrument panel and a couple of screws entering from the glove compartment. Now reach in and unscrew the speedo cable from the speedometer. Remove the steering wheel. That is easy if you have a 24mm spanner socket on at least 13-inch extender.
Unscrew all the black hex slot screws around the instrument panel. That is much easier to do with a hex bit screwdriver than fiddling with one of those little L-shaped hex keys.
Now you can pull the instrument panel out of its deep recess though it may make you wince when you have to bend it about its weakest point at the center. As soon as they come into reach, unscrew the 2 heavy cables held by nuts at the back of the ammeter (you DID disconnect the battery first ??). The rest of the wires pass through 3 rectangular plastic connectors that you pry apart. I can send you pictures of doing this on my car. Caleb B. Urraco P250S no. 15 812hini
Brian, To remove the headliner
(roof) you will need a can of (not the aerosol) of 3M adhesive remover
(it doesn't damage paint, leather or vinyl). Remove the door
weatherstrips and any glass that has a gasket which hides a glued edge.
Also remove if there is one the panel with the sun visors and rear view
mirror. With a small brush start on the door seam and soak an edge to
get the remover underneath The glue will give and you can then soak and
separate until the headliner edges are all free. When removing
the interior leather use the same technique of glued leather. For
rebuilding the existing leather should be kept as a pattern. The vent
on the roof is a tray with drains (I'm guessing it's the same principle
as those in the Miura and Espada) which will probably be rusted,
hopefully not terminally. These can be cleaned up and powder
coated. Good luck. Charles
--------------------------------
Regarding the dash screws....I have a 74 p250 and
redid the dash...open the glove box on the right side there is a side panel that
is a pressure fit that you remove...you will then see 2 nuts tough to get at but
I used a 1/4" drive extension and I think # 10 socket and got them off. On the
other side are the same 2 nuts...remove entire instrument panel with all gauges
to get at them. (To get there goes something like this) You have to pull
steering wheel ...remove the panel that surrounds the column....remove gauge
panel.... and then you have access to the 2 nuts. After these 4 nuts are off the
dash is then free...of course you have the centre counsel to take off and have
to disconnect a bunch of switches etc but those things are all self explanatory,
what you are looking for are hose 4 nuts and then the dash slides straight back
towards the rear of the car as the dash has a slot that the remaining studs
slide along. Hope this helps. I am just completing my entire interior
rebuild so may be able to offer other bits of advise. Feel free to
correspond.Glenn Weir P250 #15474
Pretty sure the Urraco brake pads are BMW 2002 - pads are
available through eurospares in uk as an Urraco fitment or through a specialist
2002 outfit such as jaymic in the uk & are indecently cheap - even BMW's
prices arn't too bad - certainly better than Lambo - handbrake brake pads are
unique & should be sent off for recovery of lining - there are
specialist companies available for this sort of thing & not expensive - pads
are only about the size of a siver dollar/old 50p piece anyway.
i think also whilst the callipers are unique they
are simply bmw 2002 units with an added spacer - all above
scourses (especially jaymic) should be considered for bits & bobs such
as seals and pistons.
i have been told that the handbrake pads were a
shared unit with some vintage jag but spent fruitlesss hours asking vintage jag
boys (very unfriendly lot).
basically the parts bin stuff off the car &
there's quite a lot of it is either bmw 2002 (possibly 2002tii for discs etc)
and fiat 130 coupe (hard to obtain now but cheap when available)- certainly the
bmw stuff is still very much available and dirt cheap - my other daily classic
is a timewarp bmw 2002 and would you bellieve even the floormats are still
available for this model 30 years after it went out of
production..............wait for it...........IN 3 DIFFERING
COLOURS!!!!!!!!!!
amazing. all imhu & please check & double check with
local suppliers before ordering. hope this of some limited use.
bax
www.miuraworkshop.com
