| description |
Lamborghini part number |
OEM manufacture part number |
notes |
||
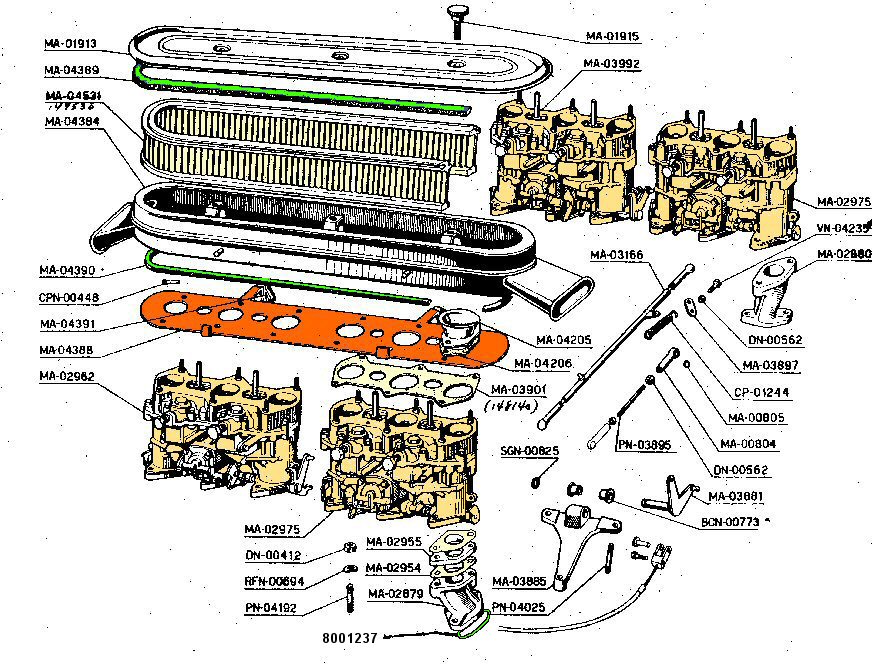
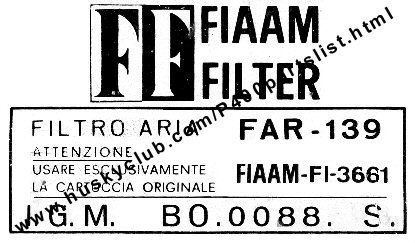
| filter, air |
MA-04531 |
Fiaam FI-3661 |
Baldwin PA-2093 |
||
| gasket, foam strip top |
MA-04389 |
||||
| gasket, foam strip bottom |
MA-04390 |
||||
| gasket, individual air
horn |
MA-04206 |
||||
| gasket, carb top |
MA-03901 |
||||
| gasket, intake manifold
individual |
MA-02954 |
||||
| isolator, intake manifold
heat |
MA-02955 |
||||
| o-ring, intake manifold
individual |
GN-01237 |
||||
| nut, weber to intake
manifold |
DN00412 |
||||
| washer, weber to intake |
RFN-00694 |
||||
| stud, weber to intake |
PN-04192 |
||||
| Weber 40 IDL 3C -
2ea - left side front/rear |
MA-02975 |
40 IDL 3C1 #xxx |
serial numbered |
||
| Weber 40 IDL 3C -
1ea - right side front |
MA-02962 |
40 IDL 3C2 #xxx |
serial numbered |
||
| Weber 40 IDL 3C -
1ea - right side rear |
MA-03992 |
40 IDL 3C3 #xxx |
serial numbered |
||


| Description Weber |
Fig # |
Quan |
OEM Weber# |
Current Weber # |
Description Italian |
Size in mm |
notes |
|
| Venturi |
67 |
3 |
34894.002 |
Diffusore |
30 |
32 |
||
| Aux venturi |
68 |
3 |
31966.003 |
Centratore |
4.50 |
|||
| Main Jet |
60 |
3 |
41120.001 |
Getto principale |
1.25 |
1.30 |
||
| Idle jet |
65 |
3 |
41160.003 |
Getto minimo |
0.55 |
|||
| Air bleed |
na |
3 |
Getto aria |
1.10 |
||||
| Accelerator pump jet |
70 |
3 |
41252.001 |
Getto pompa |
0.50 |
|||
| Air jet |
74 |
3 |
41360.001 |
Getto aria di freno |
1.80 |
|||
| Mix tube |
73 |
3 |
61440.151 |
Tubetto emulsionatore |
F 26 |
|||
| Inlet valve |
72 |
1 |
64290.001 |
Valvola aspirazione (con
foro di scario) |
0.50 |
|||
| plate valve |
25 |
1 |
64190.004 |
Valvola a piattello |
closed |
|||
| float needle valve |
5 |
2 |
64240.009 |
Valvola a spillo |
1.75 |
|||

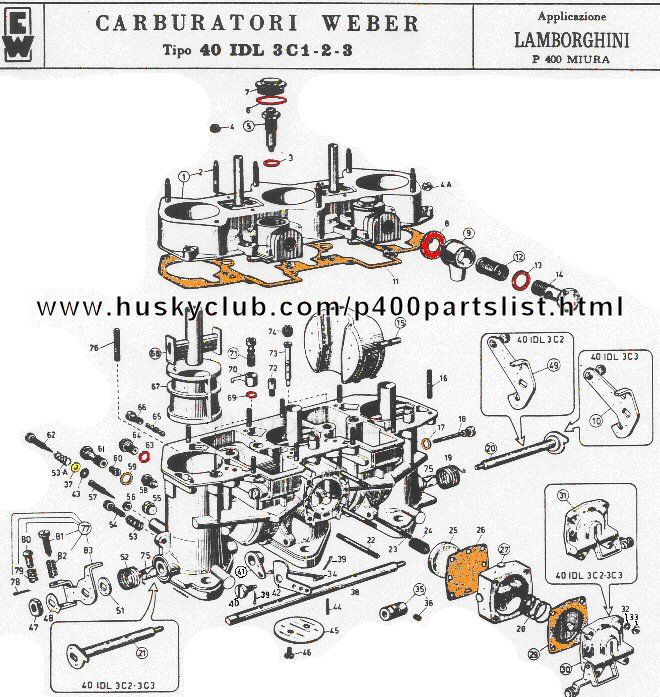

| diagram number |
Quantity per carb |
Description 40 IDL Lamborghini |
Weber no. 40 IDL 3C vintage |
material |
finish |
Weber no. 40 IDA 3C 2006 |
size P400 | notes from vintage pieces |
ref |
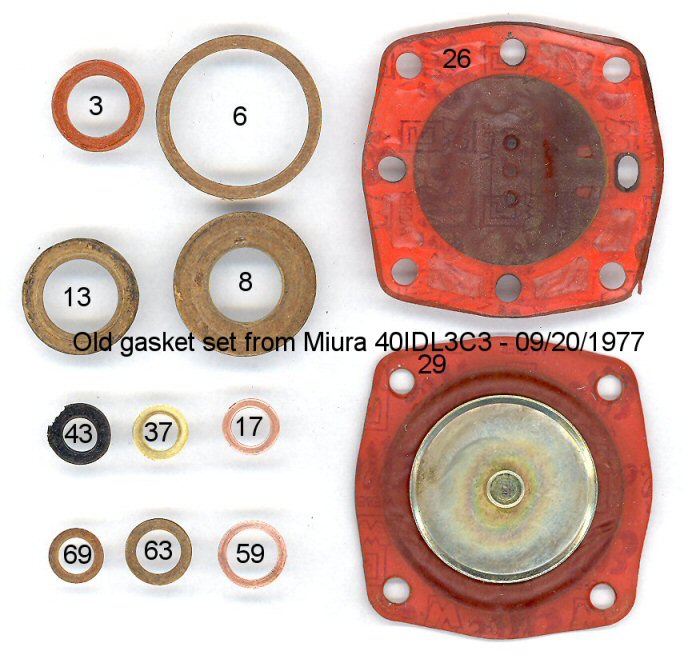
| 3 |
2 |
gasket, needle valve |
41530.005 |
fiber |
red |
41530.005 |
10 x 15 x 1 |
||
| 6 |
2 |
gasket, plug |
41530.035 |
fiber |
41530.035 |
22 x 26 x 0.85 |
|||
| 8 |
2 |
gasket, fuel inlet |
41530.004 |
fiber |
41530.004 |
12 x 23 x 1 |
|||
| 11 |
1 |
gasket, cover |
41710.001 |
paper |
41710.001 |
0.5 thickness |
|||
| 13 |
2 |
gasket, fuel inlet |
41530.001 |
fiber |
41530.001 |
12 x 18.5 x 1 |
|||
| 17 |
2 |
gasket, copper flat ring |
41530.017 |
copper |
41530.017 |
6.10 x 9.0 x 0.86 |
|||
| 26 |
1 |
diaphragm, plain, pump |
47405.011 |
flex mat |
red |
47405.011 |
|||
| 29 |
1 |
diaphragm, metal, pump |
47407.010 |
flex mat |
red |
47407.010 |
|||
| 37 |
3 |
washer, needle oring seal |
55510.018 |
brass |
nat |
55510.018 |
5.5 x 9.0 x 0.50 |
||
| 43 |
3 |
Oring |
41565.002 |
rubber |
black |
41565.002 |
5.0 x |
||
| 59 |
3 |
gasket, main jet retainer |
41540.001 |
copper |
nat |
41540.001 |
8.0 x 11.0 x 0.55 |
||
| 63 |
2 |
gasket, bowl drain plug |
41530.008 |
fiber |
41530.008 |
7.0 x 10.6 x 0.85 |
|||
| 69 |
3 |
gasket, pump jet |
41530.012 |
fiber |
red |
41540.014 |
5.75 x 9.0 x 0.80 |
||
| items not adressed by either spec sheet |
|||||||||
| 3 |
gasket, air horn to top | lambo |
paper |
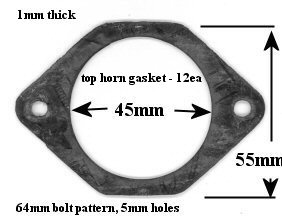 |
45 bore x 65 bolt pattern x 1mm thk x 6mm holes |
MA-04206 |
|||
| 1 |
gasket, top to air cleaner plate |
lambo |
paper |
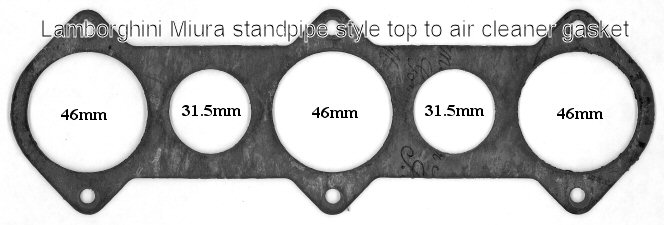 |
stand pipe carb |
MA-03901 |
|||
| alt |
1 |
gasket, top to air cleaner plate |
lambo |
paper |
99005.020 ? | 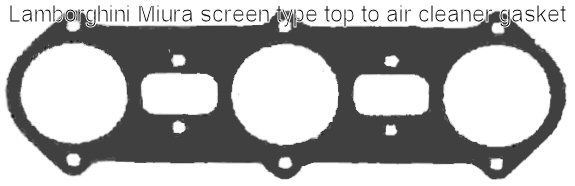 |
screen carb |
||
| 6 |
gasket, base |
lambo |
paper |
? |
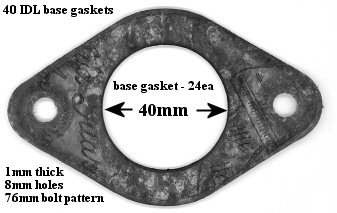 |
40 bore x 76 bolt pattern x 1mm thick x 9mm holes |
MA-02954 |
||
| 1 ft |
wire, safety, choke set screw |
steel |
0.5 mm steel wire |
||||||
| 1 ft |
wire, safety, float fulcrum pin |
copper |
0.5 mm copper wire |
||||||
| other items usually included in a basic "kit" |
|||||||||
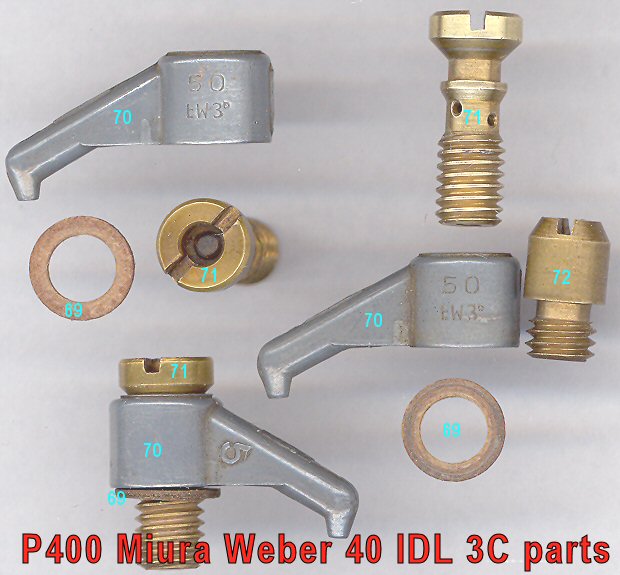
| 5 |
2 |
needle valves, pin valves |
64240.009* | brass/steel |
79508.* |
175 |
marked - EW 175 |
||
| number | Description of product to be used in Weber rebuild | material | container | graphic | notes from vintage rebuilders | additional ref |
| 1 |
Hylomar spray gasket sealant |
Hylomar |
spray 5oz 12oz |
 |
lay out all paper and metallic gaskets , spray light coat and wait till dry, flip and spray backside of all gaskets the same |
HylomarBlue.com |
| 2 |
Alodine 1001 clear chromate |
bulk qt gal |
used to restore the original Weber finish when a light tan color is desired |
|||
| 3 |
Alodine 1201 chromate conversion |
bulk qt gal |
 |
used to restore the original Weber finish when a deeper tan/gold is desired |
||
| 4 |
Permatex gasket remover |
spray 16oz |
 |
used as a carb cleaner after intial cleaning with cheap carb cleaner if original carb finish is to be retained, do not use any metallic brushes or wool along with this . Only plastic or hair bristles! |
||
| 5 |
Carburetor spray cleaner |
spray 16oz+ |
 |
cheap carb cleaner for intial cleaning and to follow up clean away the more aggressive gasket remover gel . if original carb finish is to be retained, do not use any metallic brushes or wool along with this . Only plastic or hair bristles! |
||
| 6 |